When I make bread these days (and when I cook in general), I tend to think about which ingredients I could get if the grid went down, the country fell apart, and grocery stores were not an option.
Right now, of course, I can go to the grocery store and buy all the ingredients I need to bake any kind of bread (and faint when I see the prices, but that’s another story.) So getting yeast to make my bread rise is not a problem. However, I think it makes sense for me to get used to cooking in a way that I could sustain for months, or years, in an SHTF scenario.
That’s one of the many reasons that I learned how to make sourdough bread, and also why I learned how to make sourdough starter from scratch. Right now, I can order sourdough starter any time I want. However, that may not always be the case.
Why Sourdough?
Sourdough bread has a distinctive, tangy taste, which I happen to love. There are a lot of other reasons why I think sourdough bread is better than regular bread, and I’m not the only one. According to Healthline, sourdough bread is less likely to spike blood sugar, contains less gluten than regular bread, and is easier to digest.
And, you can make sourdough without store-bought yeast, which can come in handy even in non-emergency situations, if you just can’t make it to the grocery store. I have a bunch of yeast on hand now, but yeast doesn’t last forever and if it’s long past it’s recommended date, and it’s lost its efficiency, then any bread I try to cook with it will not rise properly. In a post SHTF-scenario, where supplies are scarce, you better believe we’d be eating that bread anyway, but given a choice, I’d rather just make bread that rose properly.
Making your own sourdough starter is much cheaper than buying the starter, it’s useful knowledge to have, and you can get your kids involved and use it to teach them multiple things. It’s a science lesson, a cooking lesson, and a way to teach your kids how to prep.
To make sourdough bread, however, you will need a few ingredients, including flour, water, and sourdough starter.
How To Make Your Own Sourdough Starter
Ok, it’s time for me to show you how to make sourdough starter from scratch.
Ingredients
- Whole wheat flour
- All-purpose flour
- Non-chlorinated water. If you’re using city water, let your water sit out for a day so the chlorine can dissipate.
Equipment:
- A clean one pint jar
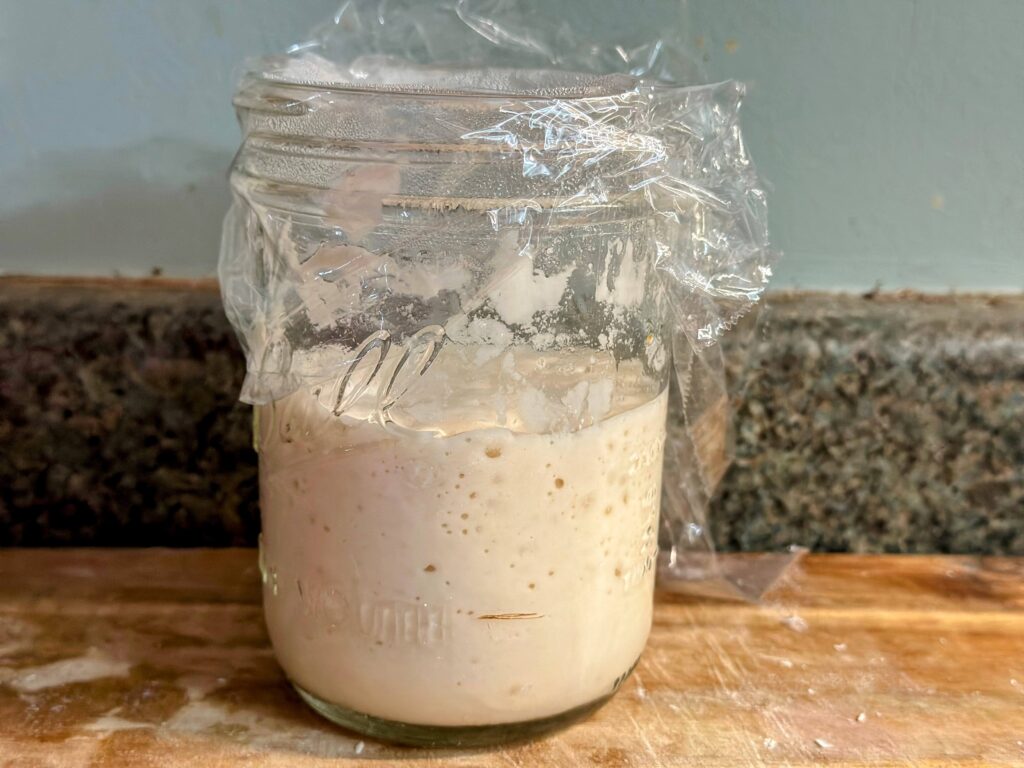
- Plastic wrap to cover the top
- A measuring cup
- A digital scale
- A seed starting mat for warmth if you don’t have a warm area to keep your starter
- A rubber band or pen, to mark where the starter is so you can see how much it has risen.
Sourdough starter does best in a warm room; it will take longer for it to become viable in a colder room, so if you don’t have a warm room, a trick that I like to use is to put it on a seed starting mat, and put a box over it to keep the warmth in.
I like to weigh my glass jar before I put the mixture in, and then write down the weight on the bottom, because sourdough starter is all about adding ingredients by weight rather than volume, and it makes it easier to calculate how much flour and water you need to add when you’re feeding it.
I use a mixture of half whole whole wheat flour and half all-purpose flour, for my initial mix. You will find many variations on how much flour to use in the beginning, and what type to use, although they’re all pretty close. I like to start with 100 g of my flour mix and 100 g of warm water. Among other things, my jar is marked at 100 liter intervals and this makes it easier for me to measure.
Also, you will always measure your ingredients by weight, not volume.
Getting Started With Your Starter
Add 100 g of water and 100 g of your 50/50 flour mix to the jar and stir it up until you have a pasty, gooey concoction. You should now have about 200 grams of starter mix.
You can either put a rubber band on your jar, at the top of the starter, or you can take a non-permanent pen, or you can even use a strip of tape, to mark the height of your starter.
Make sure that the starter is kept in a warm room, covered with your plastic wrap or a cloth cover if you prefer.
Keep an eye on the starter, and you will see it start to rise above where you marked the jar with your pen or rubber band or tape. Sourdough starter rises and falls pretty regularly.
Day 2
Do not feed it today. You should see some bubbles in your sourdough and it’s probably risen and fallen by now.
Day 3 After You Started Your Starter/Day 1 of Feeding
It is time to start feeding your starter. I have named my starter “Seymour”, after the carnivorous plant in Little Shop of Horrors that’s always yelling “Feed me”.
This is also when you start discarding part of your starter. You can use the discard to make sourdough starter biscuits, sourdough starter pancakes, and lots of other recipes. The reason you need to discard sourdough starter is that as you add flour and water every day, you would end up with a massive amount of starter if you didn’t discard part of it daily.
You will want to remove all of your starter except about 60 grams, and put the starter discard in a clean jar to use it for whatever recipe you like. You can also feed it to livestock. Or, you could throw it away.
Now, measure out 60 grams of your 50/50 flour mix, and 60 grams of warm water, and mix them in with your remaining sourdough starter. You now have approximately 180 grams.
Days 3-10 (Approximately)
Repeat this same process every day to keep building up the colonies of yeast and bacteria in your starter. You will be removing all but 60 grams, saving that discard for other recipes, and adding in 60 grams of water and 60 grams of flour to your starter, and stirring it up.
Do it at the same time every day to ensure that your starter doesn’t go more than 24 hours without feeding. If the yeast doesn’t get feed, it starts to starve and die off.
I like to keep marking my jar to make sure that my sourdough starter is regularly rising. It’s also fun, especially with kids.
The starter rises because the yeast and bacteria are consuming the nutrition from the flour that you’ve added, and they then produce carbon dioxide bubbles. The starter usually only stays ‘risen’ for a couple of hours, then starts to sink again.
Days 4, 5 and 6 may be a little slow. Be patient. By day 7, if the starter is feed regularly with the right ratios, it should start bubbling.
When Is Sourdough Starter Ready?
It’s not an exact science as to how long it takes for the starter to have built up enough yeast to be ready to use in baking.
The warmer the room, the faster the yeast in your starter will reproduce, as long as you are feeding the starter regularly. By around day 7 to 10, your starter should be ready.
The way to test it is to put a spoonful of your sourdough starter in a glass of cold water. If the starter floats, it is ready. If it sinks, it is not ready.
It also should have that vinegar-y sourdough starter smell to it.
Also, don’t use your starter for baking right after you’ve fed it. Feed it, and then wait a couple of hours for the yeast to devour their meal and get all bubbly with excitement. Then – COOK THEM! (That went dark fast, didn’t it?)
So, when your sourdough starter is ready, it’s time to make some delicious sourdough recipes!
What To Do With Any Remaining Sourdough Starter
You can store your unused sourdough starter in the fridge. You should take it out once a week and feed it, maintaining the usual ratios. It can last this way for months, but if it gets a dark layer on top and/or begins to smell bad, you should throw it away and start over.
The sourdough starter will need to be re-activated a few days before using it. You will need to take it out, let it warm up, then start the feeding cycle again. You should be able to re-activate it in a few days.
But remember, test the starter to make sure that it’s ready, before you use it in a recipe. If it doesn’t float, keep feeding it until it’s ready!
