Anyone preparing for a long-term SHTF scenario needs to learn how to garden. Since our goal here is to become as independent as possible and to be able to survive without going to the store, that means you also need to learn how to make your own compost.
Even in a non-SHTF world, making your own compost just makes sense. It saves money, and it’s friendly for the environment.
What Is Composting?
Composting is the process of taking nutrient-rich matter that you would have discarded, and mixing it up in the right proportions, so that it breaks down and becomes food for your plants.
Learning how to make your own compost is part of Survival Gardening 101. You’re going to want your garden to be as productive as possible, and that means regular fertilization and composting. Fertilizer and compost aren’t the same things, by the way, but they’re both important to the health and productivity of your garden.
The simple version of the difference between the two: compost feeds the soil and fertilizer feeds the plants. You want to compost all of your planting soil about a month before you plant, or at the end of your growing season, because compost takes a little while to work its magic. You will want to fertilize your plants throughout the season, with fertilizer specifically formulated for the individual type of plant. (For instance, blueberries need more acidic fertilizer. Tomatoes thrive on calcium, which you can provide with crushed-up egg shells.)
Every year, your plants will consume the nutrients in the soil around them. By the end of the season, therefore, there’s less food for them, and if you don’t amend the soil, next year your crops will dwindle. Over time, they may stop producing completely, if you don’t feed them.
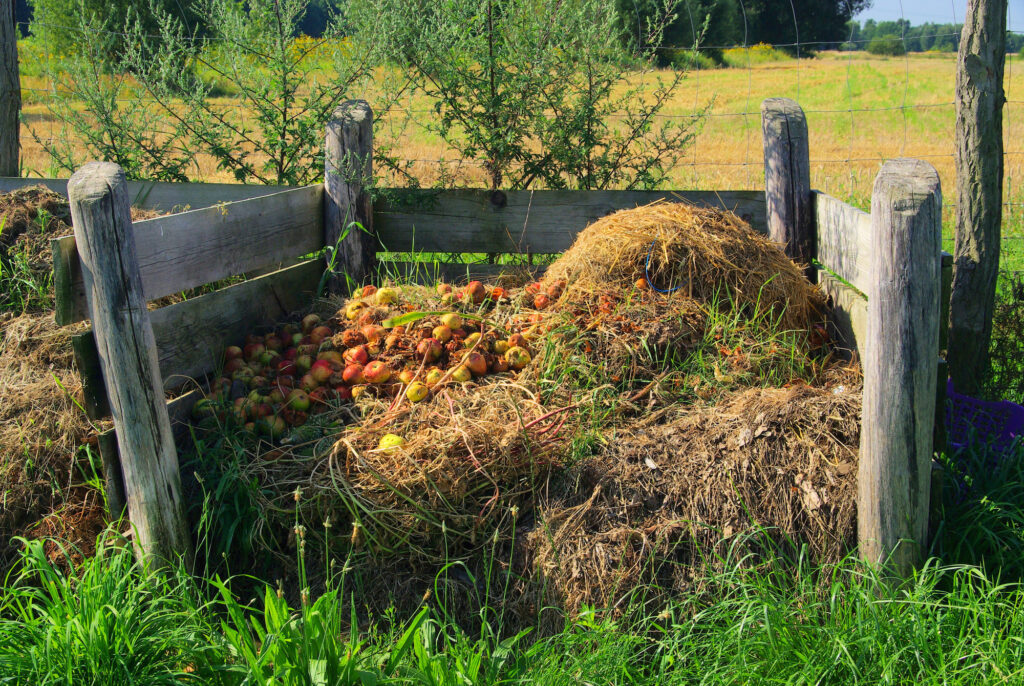
The good news is, you can make excellent organic compost from, basically, scraps. You will be using leftovers from your kitchen, shells from your chickens if you have them, and yard litter. Instead of throwing your kitchen scraps away and filling up landfills, you’ll be putting them to good use. I have a small compost bin in my kitchen and I throw all of my compostable food scraps in there.
You just need to know what scraps to use and which ones to avoid.
What Not To Use In Compost
- Any diseased plants, or any parts of diseased plants. The pathogens can survive the composting process and then infect your garden.
- Dairy products. Milk, cream, cheese and dairy are unfortunately attractive to pests.
- Meat. Meat also will attract pests, like rodents, bears, and other undesirables, and will stink to high heaven and have maggots in it as it rots.
- Human Waste – can contain diseases.
- Animal Waste – can contain diseases.
- Cooked rice can contain pathogens.
What To Put In Compost
- Green materials (nitrogen-rich)
- Grass clippings, as long as you’re not using chemical fertilizer.
- Fruit and vegetable scraps. I have a small compost bin in my kitchen and I regularly carry it out to the composter.
- Coffee grounds. Yes, coffee is brown but it counts as a green. I know, I’m confused too.
- Eggshells
- Brown materials (carbon-rich)
- Dried leaves – finally, a use for those leaf piles!
- Newspaper, other paper. Shred it so it breaks down faster.
- Cardboard – again, shred it so it breaks down faster.
- Straw or hay
- Sawdust and wood chips
- Corn Cobs and stalks
Proportions of Greens To Browns
When you see people discussing how to make your own compost, you will get a variety of opinions on how much green to use vs how much brown. I tend to follow the formula of 3 parts brown to 1 part green, so, 75 percent brown to 25 percent green. If you lower the percentage of browns, you will find that your compost breaks down more slowly.
Where To Put Your Compost
When I first started gardening, I made the mistake of putting my composting bin right by my kitchen door. This was a mistake for a couple of reasons.
Firstly, the area I put it in didn’t have that much sunshine. And secondly, it was not close to my garden, and since this wasn’t a wheeled bin that I was using, it was a real PITA to get the compost over to the garden.
Ideally, you will put your compost in a sunny location, to help it break down faster, and you will put it close to your garden so you don’t have to carry it as far. Why make more work for yourself when you’re already busy dodging zombies?
What Type Of Compost Bin Should You Use?
There are countless containers you can use for your compost. I even know some gardeners who just make a big old pile on the dirt near their garden.
You can DIY containers in a number of ways, including drilling holes in a garbage can (you need drainage and ventilation) or building them out of pallets.
I personally like compost bins that you can rotate, because as we will discuss shortly, stirring up your compost pile regularly will increase the rate that the organic material breaks down. Also, I like to use two compost bins. One of them is where I throw my newer scraps. The other one contains the already-broken down material from the previous year, and I use that one for my garden.
That way, I’m not throwing a bunch of un-broken-down scraps into my garden, where they’ll just litter it up and not do the soil any good.
How To Layer Your Compost
Your compost needs good air circulation and drainage, so I like to start with a base layer of twigs and branches. That is your browns.
Then, a layer of greens on top of them.
Then another layer of browns. You can also throw in some compost from last year’s compost pile, because it already has lots of microbes in it that will accelerate the composting process. If this is your first compost pile, and the zompocalypse hasn’t hit yet, or the foreign troops haven’t invaded, or the EMP hasn’t detonated, then you can compost accelerator from your local garden store or online.
Then, next year, use a small amount of your compost for your new compost pile.
Mixing Your Compost
Your compost should be stirred up regularly, using a pitchfork. At least a few times a week is good. Daily is ideal. If you have a tumbler, turn your compost daily. This helps the material to break down and turn into compost much faster. If you don’t stir your compost, the majority of it may never break down.
How To Tell When Your Compost Is Ready
Your compost pile should have shrunk to at least half its former size, and the matter should have broken down, although you may see some random twigs or wood chunks.
Once the compost looks the way it should, I test whether compost is ready by using the radish seed method. Take a handful of your compost, put it in a couple of little pots, and put a few radish seeds in the pots. The reason you pick radish seeds is because they germinate very quickly. Within a week, most of your radish seeds should have germinated into healthy little seedlings with green leaves. If none of them germinate, or if only a couple do and they look sickly and their leaves are yellow, then your compost is not ready yet.
At this point, you can add compost accelerator if you’re getting impatient or it’s drawing close to the time that you need to start using your compost. Remember, you want to start at least a month before you plant, to give the time for the compost to permeate the soil and share its chemical magic. You can also spread that compost at the end of your growing season, to get ready for next spring.
Congratulations! You have now learned how to make your own compost.