If you’re prepping for any emergency that might last months or years rather than weeks, you need to include gardening in your plans. You can stockpile enough food to last for months, maybe for years, but not forever. Even the long-term survival foods made by companies like Augason are only rated to last 20 to 25 years.
Also, even if you have a lot of stockpiled foods, eating fresh fruits and vegetables is going to make your food stores last longer, and the health benefits of eating fruits and vegetables include lower blood pressure, lower cancer rates, reduced risk of heart attack, and many more. Fruits and vegetables also provide much needed fiber, and add variety and flavor to your diet. An endless diet of canned and dehydrated food is going to get tiring.
Is growing your own food easy or hard, though? Yes.
Is it cheap, or is it expensive? Also yes.
Basically, you can make gardening as easy and affordable as you want, or as large-scale and expensive as you want. If you’ve never gardened before, get started now, and just start small, with a few plants.
Getting your kids involved in growing the survival garden is an absolute must. Every kid I know loves doing little gardening projects. You will be doing your child an enormous favor if you teach them how to grow their own food, and you will be encouraging healthier eating habits as well.
I homeschool, and I include gardening in the curriculum. You can get worksheets for your children and show them the different parts of the plant, and you can keep a plant journal, noting when you planted the seed, measuring the plant as it grows, and noting how long it takes from the time you plant the seed until the time to harvest.
If there ever comes a time that you’re living off the food that you grow, by the way, time to harvest is going to be vital information in assessing your food supply. Some plants can produce food in as little as 30 days; others can take three to five months.
Getting Started With Your Survival Garden
You can start on a small scale for very little money. You can grow plants even if you and your family live in an apartment and don’t even have a balcony. You need some seeds, some soil, a container of some type – doesn’t even have to be a plant pot – and sunlight and water. Sunlight’s free, you’ve already got running water, you can find a container in your house that you can put to use.
Do keep in mind, some plants, like tomatoes, will grow pretty tall – tomatoes can grow from a tiny seedling to five feet tall or higher, and they will need a large pot, and a stake to hold them up, and ties. You can still do this indoors, though, plenty of people do.
You will need:
1.) Seeds Or Seed Starts
Some libraries actually give seeds away for free. Call around your area and check.
You can search on Facebook or the internet to see if there is a local seed exchange in your area. If you buy organic fruits and vegetables, you can actually use the seeds from a lot of them, including tomatoes, peppers, and squash. Buying non-organic fruits and vegetables may not yield the same results; a lot of them are hybrids, and whatever grows from their seed may not be the same as the parent plant. Some of them are even treated so they won’t reproduce.
If you can’t find any free seeds, or you want to grow a specific type of plant, you will find packets of seeds at your local garden center, at Home Depot or any other home improvement chain, and many other places, for a few dollars a packet, or less, or you can order an infinite variety of very affordable seeds and bulbs online.
The seed packets will have specific step by step instructions on how to grow that particular variety.
You can also buy what are called “seed starts” or “plant starts” every spring and summer at any garden center,. These are seedlings that someone else planted six to eight weeks earlier, which can give you a head start on your growing season. We’ll talk more about the growing season later, because if you are planting outdoors, knowing when to plant is going to be vital to the success of your garden.
Once you’ve started gardening regularly, you can save the seeds from most of the plants that you grow, or divide the bulbs if you’re growing things like garlic, and you can get to the point where you don’t even need to buy many seeds every year to maintain your garden.
I do still buy some seeds and seed starts, but I also collect seed from my favorite fruits and vegetables every year. I always choose the largest, healthiest plants because plants inherit the characteristics of their “parents”.
I’ve been growing watermelons, peppers, tomatoes and varieties of squash and cantaloupe, and broccoli, and dill, from plants that I bought over a decade ago. These are like their great-great-great-great-great grandchildren. I’m eating their great-great-great-great grandchildren…ok, that went dark fast! Ahem. All I can say is, the great grandkids are tasty.
What To Plant First
If you are gardening for the first time, you will want to start with something that’s easy to grow. One idea would be to start with growing your own salad, because it’s a fun project for kids. Tomatoes and lettuce seeds would be a good start. You can find “grow your own salad” kits or just pick the variety of tomato and lettuce that you want to grow.
Sunflowers are also a lot of fun to grow, and I have found them very easy to grow, as well. They do require a lot of sun and can easily grow six to eight feet tall. To plant those, you’d need to have an area outside that gets adequate sunlight for at least six to eight hours a day. They also attract a lot of pollinators, including bees, so that may affect where you choose to plant them.
You can also grow herbs and spices very easily, both indoors and outdoors. I like to maintain a small kitchen garden. Mint and basil are wonderful indoor plants.
Mint makes wonderful tea, as well; I drink mint tea all summer long. Do be careful with mint when you’re planting it in the garden; it becomes very invasive and spreads like wildfire, so you’ll have to stay on top of it. Basil makes an awesome pesto sauce.
Finally, you can grow your own microgreens at home. They are nutrient-dense, take up very little space, and can be harvested within a couple of weeks. They’re fantastic to add to salads and are great to grow indoors over the winter when your outdoor garden is buried under snow. I purchase microgreens online, set the trays up under a plant light or by a window that gets a lot of sunlight, and grow them year-round.
Soil For Your Seedlings
Yes, you could just dig up some dirt from your property, if you own any land, but odds are the seedlings won’t grow as well – or at all – as they would with a seedling mix. You want as many of your seedlings to germinate and flourish as possible, and picking the right soil will increase your odds of success.
Seedlings are tiny and have delicate little roots, and may have a harder time getting established in dense, heavy soil. Sure, plants have been growing on their own in nature without special seedling mix ever since God created the world, but our goal here is NOT to plant hundreds or thousands of seedlings and have only a few hardy souls survive, the way it happens in nature. Our goal is to have most of or all of our seedlings make it. No seedling left behind!
Seed Starting Mix
You can either buy seed starting mix, or make your own. Making your own is more economical.
To make my seedling mix, I use this formula. All of the items on here can be purchased from your local garden supply store or online:
- 4 parts compost from your compost bin (or buy it at the store) for nutrients
- 1 part perlite – little white puffy balls, made from volcanic glass, has a neutral PH, provides aeration for those delicate little roots
- 1 part peat moss or coco noir – fibrous, fluffy, holds moisture
- 1 part vermiculate – holds moisture
Now, since we’re talking about prepping, we have to acknowledge that someday, in a widespread long-term disaster like permanent grid down, we might not have access to seedling mix, or the materials to make seedling mix.
Farmers have been growing their own plants for thousands of years without it – we just happen to be lucky enough to have a lot of tools and supplies these days that make gardening easier.
To prepare for an SHTF scenario, you should stock up on a lot of seedling mix supplies. You can get very large bags of the supplies for very economic prices.
You’ll also want to start getting familiar with the soil on your property. What parts of your property get a decent amount of sun every day? What is the quality of the soil? You can get your soil tested by your local extension office in most areas. This will tell you if it needs amending, and what you would need to amend it with.
Pots For Your Seedlings
I have always grown my seedlings in Jiffy trays or in egg cartons, set on a tray so that the water doesn’t leak onto the counter. This Jiffy Window tray is perfect for a first time gardener to get started, and works well for an apartment type setup. It comes with its own little seedling starter discs, and the two pack will let you grow 24 plants, or you could just start with one 12 pack and use the other one the following spring if you like. Follow the directions on the seedling tray.
If you are growing more plants, you can buy the larger trays with 36 plant cells.
You can also use cardboard egg cartons or even egg shells, or dixie cups, or many other small containers you may already have in your house.
Why would you start your seedlings in small pots rather than plopping a tiny seedling into a large pot from the start? Because when you plant your seedling in a large pot, the seedling roots don’t get watered properly. They either dry out or get waterlogged.
So I always start with small pots, and then in a few weeks when the seedlings are outgrowing the small pots, I transplant them to larger pots.
How To Grow Your Plants From Seedlings
If you are planning on planting outdoors, you will need to know your last average frost date. This is the last date that your area typically experiences below-freezing temperatures. You don’t want to plant your seedlings outside too early. A lot of plants, like tomatoes, will die and turn to mush when the temperature drops below freezing.
Some plants, like lettuce, spinach, broccoli, brussel sprouts, cabbage, leeks, and parsnips, are more cold hardy and can be planted outdoors earlier, in April in many areas. This will extend your growing season. Ideally, you want to work your way up to having several crops. Start the cold season crops as early as you can, harvest them when ready, then move on to the warmer season ones, and then at the end of summer, you can plant another crop of cold-hardy vegetables to be harvested in the fall.
Start your indoor seedlings for your non-cold-hardy plants, approximately six to eight weeks before your last average frost date.
Why? Because this gives you a head start on the growing season.
So why not start your plants even earlier, and then plant them outside fully grown after the last average frost date, to get even more of a head start?
Excellent question. Unfortunately, one seedlings get too big and mature into full-grown plants, they can suffer from transplant shock if moved to another area of the garden, and they can wither and die or just end up being much smaller. Also, full grown plants get very big and you probably don’t have room for a full-sized garden in your house.
Supplies:
- Seeds
- Seedling Mix
- Small pots
- Plant Grow lights (or just put them by a window that gets a lot of sun)
- Heating Mats (or just keep them in a warmer area)
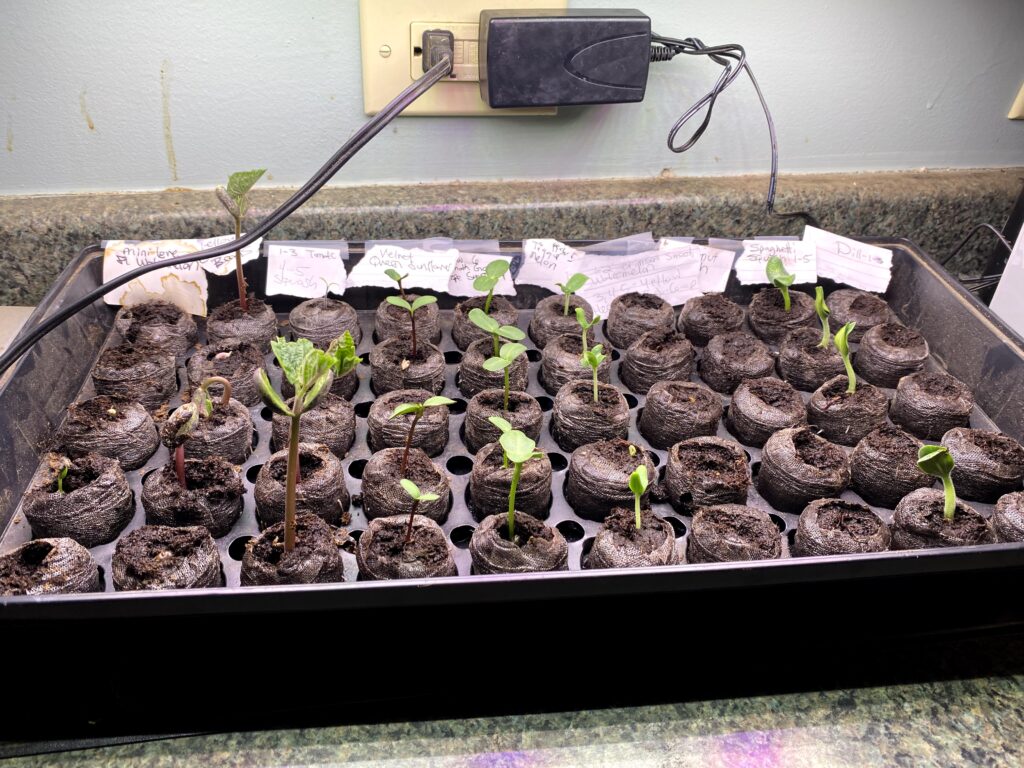
- Labels, so you can identify the types of seed you planted, and the date you planted it. You can use popsicle sticks, or you can buy labels from a garden center.
Plant the seedlings
Put your plant pots in a sunny area or under a plant grow light, and put them on top of a heating mat if you choose to use one. Plant two or three seedlings in each little pot, because not all seeds will make it. Water according to instructions for the particular type of plant. Don’t drown them, but don’t let them dry out either. Check the soil every day, it should be damp, and water approximately every day or every other day depending on the soill
Within a few days to 10 days, you should see seedlings. Any plant pots that don’t have seedlings by then, the seedling has failed.
Wait a few more days and then carefully remove the smaller, weaker seedlings, leaving only the largest, healthiest seedling.
When to Transplant Seedlings
When your seedlings first emerge, they will have a frail, spindly stalk and most plants will have a pair of what are called cotyledon leaves. These are not the plant’s true leaves, and probably will not be the shape of the plant’s true leaves.
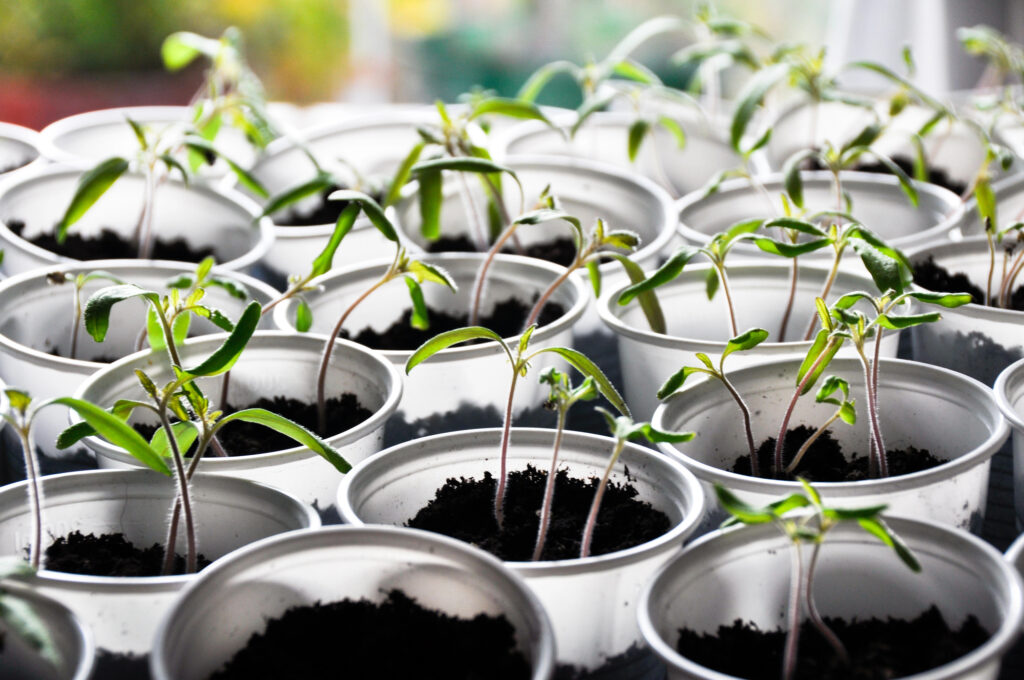
The tomato seedlings in the photograph have cotyledon leaves.
When the seedlings are several weeks old and have a few sets of their true leaves, you can transplant them to larger pots.
Do not pick them up by the stalk, repeat, do not pick them up by the stalk! This is not a drill! The stalk can be bruised or damaged this way and nutrients won’t be able to travel up the stalk and reach the leaves and fruits or vegetables.
Now, the weather is likely getting warmer. If you are planning to plant outdoors, put your plants outside during the daytime to start hardening them. They benefit from being exposed to wind and natural sunlight. This will ease their transition of being planted in your garden.
Every spring, I put dozens of plants in trays on my front porch every morning, and bring them in every evening before the temperature gets too low.
If you’re keeping your plants indoors, you don’t need to do this.
As soon as the last average frost date passes, check your weather forecast for the next couple of weeks and as long as there aren’t any unseasonably cold nights – below 32 degrees fahrenheit, or even near 32 degrees fahrenheight – you should be good to go.
Planting Outdoors
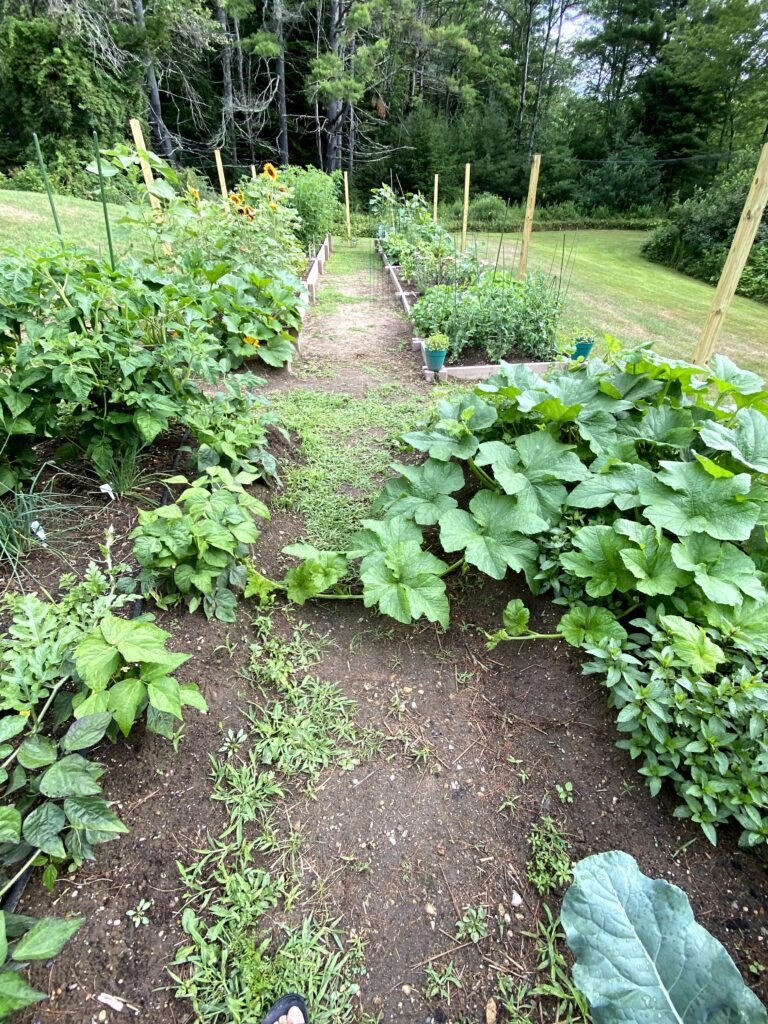
I love raised beds. You can make your own raised beds incredibly easily by buying a raised garden bed kit. They are available online and in garden supply stores, in a multitude of shapes and sizes. You can also get fabric bag grow beds. You can pick as few or as many as you want, and they are perfect for starting small, or growing in an area where you don’t have a lot of space. You can even put the fabric grow beds on your front porch if it gets enough sunlight. Do keep in mind there will be some dirt spillage.
They are easier to weed, and have less soil compaction. Don’t ever walk in the raised bed, it crushes down the soil and makes watering less efficient.
Make sure that the raised bed is deep enough to handle whatever you’re planting. Carrots need at least 12 inches; an herb garden or annual flowers such as marigolds will be fine with six inches depth.
Also, consider the height and the size of whatever you’re going to be planting. Pumpkins and squash plants take up an enormous amount of room, sprawling out everywhere by the end of the season.
Tomato plants grow to be several feet high and will need a tomato cage and some strong stakes to support them or they will topple over.
Soil For Raised Beds
You will want to dig up the weeds in the area where you’re going to put your raised bed. Then, after you put together the raised bed, you will fill it up with soil.
You can use your own soil for the bedrock layer of your raised garden bed. To fill the beds, you can buy pre-made raised bed garden soil, or make your own compost. like to use bags of 50 percent topsoil and 50 percent compost, but you will find countless raised garden bed recipes out there.
Proper Spacing For Your Plants
Here’s a guide to some of the most common garden plants. Check the varieties and follow directions on the seed packets. These directions are an approximation, for standard sizes. There are dwarf varieties, there are jumbo varieties, so plant accordingly.
- Tomatoes: 36 inches apart from each other, in rows that are 24 inches apart.
- Lettuce: Plants 12 inches apart from each other, in rows that are 36 inches apart.
- Pumpkins: Plant in mounds that are four feet apart
- Carrots: 2 to 3 inches apart from each other, in rows that are 12 inches apart
- Seed potatoes: 12 to 15 inches apart, in rows that are three feet apart.
- Basil plants: 12 inches apart, in rows that are 12 to 18 inches apart
- Dill: 10 to 12 inches apart
- Marigolds: 10 to 12 inches apart
- Pole Beans: Plant 6 inches apart, with a trellis for the plant to grow onto
- Bush Beans: 4 to 6 inches apart, in rows that are 18 inches apart
Watering Your Plants
Plants in pots tend to dry out more quickly, so check them daily, especially if they are in full sun. For my raised beds, I also check the soil regularly. Water the beds very deeply, and then let them dry out a little bit between waterings, rather than watering a little every day. If you ever see your plants start to wilt and look droopy, though, water them immediately, and if you are in a hot climate you may need to water your plants more often.
And that’s it! You are now on your way to being a gardener, and to being able to provide healthy nutritious food for your family. If you grow both indoors and outdoors, you can provide healthy fruits and vegetables year round.
Pest Control
Consider fencing in your raised beds. You’re not the only one who wants to eat your fruits and vegetables; every rabbit, deer, possum, even bear, also wants to eat them.
Gross as this may sound, having an adult male pee in the area around your garden – not IN the garden! – can discourage wildlife from entering the garden.
You can buy various traps at garden stores to catch wildlife that tries to invade your garden.
Keep an eye out for bugs. I use row covers that I buy from the garden center, to try to keep down the pest population.
I check my plants daily and manually remove as many pests as I can find. If there are too many, I like to make my own sprays, using a spray bottle filled with water, a few teaspoons of dish soap liquid (without bleach), and a few drops of vegetable oil. This has to be applied frequently.
You can also use a half cup of chopped peppers, and a few teaspoons of liquid, and a couple of cups of water, to make a spray.
Organic sprays don’t last as long as the commercial pesticides, but I prefer not to put mystery chemicals on my family’s food.
Next Steps
Find your local gardening society, and see if they have any useful lectures. Consider joining so you can learn from other, experienced gardeners.
Learn about crop rotation and companion planting.
Local agricultural extension groups have a free hotline where you can ask any gardening questions.
See what works and what doesn’t work for you every season. Some plants thrive and flourish for me, some don’t. If I try something and most or all of the plants fail, I don’t plant that variety again next season.
And most of all, have fun with your gardening journey, and never stop learning and experimenting.